Implementing a Module from Ocean Tracks College Edition in My High School Marine Biology Class
By jmueller-northcott on April 12, 2016
After using the Ocean Tracks modules from the high school curriculum for the past few years in my marine biology course, I was excited to try out some of the newly developed (draft) curriculum modules that had been designed as part of Ocean Tracks College Edition (OTCE). In this blog entry, I want to describe the steps I took to implement the Ocean Tracks College Edition module, “What’s UP with the California Coast?” in my high school classroom. In addition, I want to provide an example of how I start with the Ocean Tracks interface and a provided curriculum module and lesson plan specifically for the needs of my students.
I have found that the Ocean Tracks modules as they are written are amazing opportunities for students to learn content and practice new data literacy skills. But in addition to the modules, I think it is helpful to build in opportunities for class discussions and student collaboration into the day-to-day planning of my class, as students progress on a particular module. This really maximizes the opportunity for students to reflect on their learning so far, and test out their ideas as they collaborate with each other.
The following blog entry details the steps I took to tailor this particular college-level module for my high school class and build in opportunities for students to work together, as well as some of my own reflections on how it went. I hope that it provides you with some ideas on how to lesson plan for your own group as you incorporate Ocean Tracks into your curriculum!
As I planned for my class and considered how to best help my high school students be successful with the college level OTCE module, I knew that a few changes needed to be made. For example, I would need to be careful about the timing of the module. I had about 200 minutes for students to work on the module divided up over three classes. I knew students would take a bit longer than the college students would with some of the questions for the background research and data collection, so I had to streamline this a bit. Also, I wanted to promote collaboration and group discussion as much as possible.
1st Class Period of Module (50 mins)
The way that I accomplished both of these goals was by having students work in triads. I wanted all students to be responsible for the background information on the California current, the concept of upwelling, and a review of food webs. I divided the module into two parts, part A and part B. Part A was essentially the “Engage” slide (slide #4) on the “blob” in the Pacific Ocean, plus initial background research (for ex.) on marine food webs found on slide #9 of the module. Students completed this work independently during one class period.
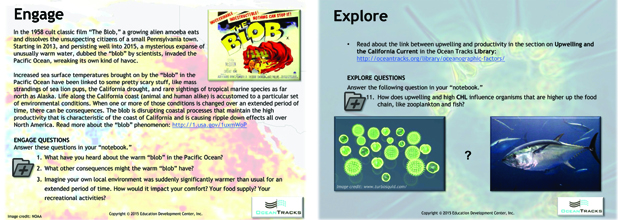
The Engage (slide #4) and Explore (#9) slides from the OTCE module, "What is UP with the California Coast?"
2nd Class Period of Module (50 mins)
The next day in class, we first reviewed their answers to their questions from the previous day. I then explained that now that all students had a foundation to work from, we were transitioning from independent work to working within a small group. Each students was assigned a number 1, 2 or 3 and students worked on part B in groups.
Each group member took responsibility for a different “Explore” slide. Using the Ocean Tracks interface, they conducted an initial exploration of the overlay maps of SST and chlorophyll concentration to see if they could each identify areas of upwelling. For example, student X completed the task found on slide #6 (students find SST and CHL maps that demonstrate upwelling). Student Y examined bathymetry maps and CHL maps to look at the effect the underwater landscape has on upwelling (slide #7) and student Z looked at the impact of seasonality on upwelling (slide #8 of the module). This took about 30 minutes or so for students to examine the overlays and collect their evidence in the form of screenshots to answer the questions embedded in the module.
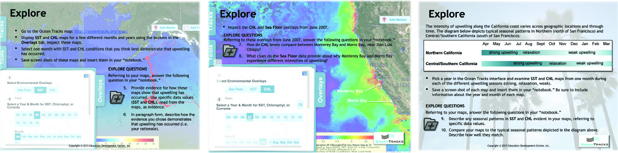
The three "Explore" slides from the OTCE module that the students worked on.
3rd Class Period of Module (100 mins)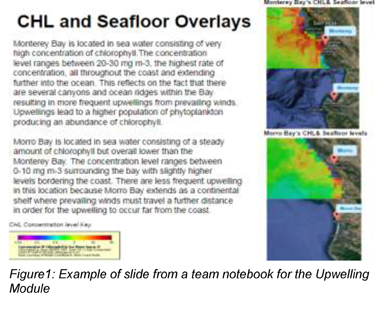 When students came back to class the next day, I had printed out the slides that each member had worked on (Figure 1 shows an example of a slide that was created by a student who was assigned to study the effect of bathymetry on upwelling). In their groups of three, students presented to each other what they had discovered through the previous day’s exploration. After their mini presentation time I displayed, at the front of the room, examples of slides that I thought completely addressed the exploration tasks, to help model for all students what the work in their notebooks should look like. After this, students then had time to continue working on the module.
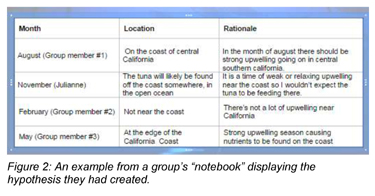
Students continued to work on the Explore section of the module but now they were thinking about how these oceanographic features they observed would impact the biology of the California coast. Each student in the group was responsible for one of the predictions on slide #10 and I filled in a sample prediction myself so that they could see what was expected. (See Figure 2 for an example of student work from a group’s notebook where they shared their predictions.) Students made this prediction based on what they had seen in the visual provided on slide #8.
Reflection: In the future, I would want to improve this step a bit by having students work collaboratively to write these predictions using their observations from the CHL and SST maps that student Z of each group had gathered to answer the questions about seasonality for slide #8. But this time around, they made those predictions independently and then went on to take some measurements for Bluefin tuna 001.
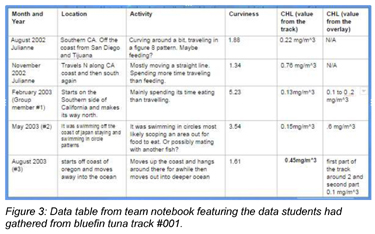
Now students were going to test their hypotheses to see if the Bluefin tuna was actually spending time feeding when there was an upwelling event along the California coast. Again, students used the divide and conquer approach to collect their measurements, I modeled the data collection for students by filling in some of the data table and each student was responsible for collecting data from one month (see Figure 3 example).
Once students had all of the measurements complete it was time for them to see if their predictions matched the data. To have students think about this, they answered a series of questions related to their observations and measurements. In the interest of time, I decided to not have students complete the synthesize activity described at the end of the unit.
Because of this I tried to incorporate some of the items from that final assessment into the questions that students would answer. In addition to the analysis questions in the module, I also asked students to answer the following:
- Can you think of any other investigations you could do with the Ocean Tracks interface that could help you gather more evidence to support your ideas?
- How do oceanographic factors such as bathymetry, upwelling, SST and time of year affect primary productivity? Use data as evidence to support your idea.
- How does primary productivity affect the migration of animals like the bluefin tuna? Be sure to use an example(s) and data from your Ocean Tracks research.
- Do you think the “blob” in the Pacific has the potential to influence the bluefin tuna? How might it affect these fish? Remember, the “blob” is thought to reduce the occurrence of upwelling.
Reflection: As students worked to finish up the last part of the module, answering the analysis questions, class began to feel a bit rushed. Students applied the divide and conquer approach so that they could complete the module complete by the end of class. I was hoping that they could have collaborated more on these final questions to help them really synthesize everything they had learned as a group over the last few days. They worked hard to use data points from the measurements they had taken, but they really missed out on the opportunity to have a good discussion with each other about the data.
Building in that critical time not just for collecting the data itself, but then also for students to really think about that data, is something that I am always working on as a science teacher. In this case, just asking them to use their data to answer the final conclusion questions, wasn’t enough for them to pause and fully consider the data. As it can often happen, we simply ran out of time to really be deliberate with this step. I was left feeling a bit unsettled that students hadn’t been as successful as I had hoped on this last piece of the module. But after spending some time reviewing their student work, I saw that they had done an excellent job working together in their groups taking the appropriate measurements and creating effective data visualizations. So my next step was to celebrate the success that they had so far, and figure out how to better help them with the next step of helping them better understand their data.
Grade Level:
- jmueller-northcott's blog
- Log in to post comments
About the Author
 Julianne served on the Advisory Board for the Oceans of Data project, which produced Visualizing Oceans of Data: Educational Interface Design, and has worked for ODI from early conceptualization of Ocean Tracks to the present, developing curriculum modules for both high school and college students. She teaches biology at Souhegan High School in Amherst, NH, and has been using Ocean Tracks to teach concepts in ecology and marine biology and to develop her students’ skills in working with complex, authentic scientific data sets for four years.
Recent Posts
Kirsten Smayda
Posted: 10/07/2021 - 09:45
Author: Randy Kochevar
Posted: 02/24/2021 - 11:29
Author: Libby Boghossian
Posted: 02/04/2019 - 10:39
Author: Randy Kochevar
Posted: 03/05/2018 - 16:28
Author: Randy Kochevar
Posted: 02/13/2018 - 20:56
- 1 of 7
- next ›